Deploying a simple Spring Boot Application on EKS
July 17, 2024
Prerequisite:
- AWS Account: Make sure you have an AWS account.
- You should be aware of Docker concepts as in how to create docker file, docker commands etc
- You should be aware of Kubernetes concepts like cluster, pods, nodes etc
- You should have aws cli, eksctl and kubectl installed on your machine.
What is EKS?
EKS, or Amazon Elastic Kubernetes Service, is a managed Kubernetes service offered by Amazon Web Services (AWS). It allows users to run Kubernetes without needing to install and operate their own Kubernetes control plane or nodes. EKS simplifies the process of running Kubernetes on AWS, allowing developers to focus on deploying and managing applications rather than maintaining the underlying infrastructure. In simpler terms, it’s a tool that helps you efficiently run and manage your software applications in a flexible and scalable way. EKS takes care of many technical details, you don’t have to worry too much about the complicated details — it’s like having someone else take care of the hard work so you can focus on using your programs
In this blog we will focus on how we can deploy simple spring boot application on Amazon EKS (Elastic Kubernetes Service)
STEP 1: Create a spring boot application
-
pom.xml
<?xml version="1.0" encoding="UTF-8"?> <project xmlns="http://maven.apache.org/POM/4.0.0" xmlns:xsi="http://www.w3.org/2001/XMLSchema-instance" xsi:schemaLocation="http://maven.apache.org/POM/4.0.0 http://maven.apache.org/xsd/maven-4.0.0.xsd"> <modelVersion>4.0.0</modelVersion> <parent> <groupId>org.springframework.boot</groupId> <artifactId>spring-boot-starter-parent</artifactId> <version>3.2.5</version> </parent> <artifactId>dineshremje</artifactId> <groupId>com.dinesh</groupId> <name>Dinesh Remje Service</name> <version>1.0.0</version> <packaging>jar</packaging> <dependencies> <dependency> <groupId>org.springframework.boot</groupId> <artifactId>spring-boot-starter</artifactId> </dependency> <dependency> <groupId>org.springframework.boot</groupId> <artifactId>spring-boot-starter-tomcat</artifactId> </dependency> <dependency> <groupId>org.springframework.boot</groupId> <artifactId>spring-boot-starter-web</artifactId> </dependency> <dependency> <groupId>org.springdoc</groupId> <artifactId>springdoc-openapi-starter-webmvc-ui</artifactId> <version>2.0.2</version> </dependency> <dependency> <groupId>org.projectlombok</groupId> <artifactId>lombok</artifactId> <scope>provided</scope> </dependency> <dependency> <groupId>org.springframework.boot</groupId> <artifactId>spring-boot-starter-test</artifactId> <scope>test</scope> </dependency> </dependencies> <build> <plugins> <plugin> <groupId>org.springframework.boot</groupId> <artifactId>spring-boot-maven-plugin</artifactId> </plugin> </plugins> </build> </project> -
Simple Restcontroller for exposing an endpoint /hello
Use the below code of Restcontroller to print the welcome message once the hello api is called
import org.springframework.beans.factory.annotation.Autowired; import org.springframework.http.ResponseEntity; import org.springframework.web.bind.annotation.GetMapping; import org.springframework.web.bind.annotation.RequestMapping; import org.springframework.web.bind.annotation.ResponseBody; import org.springframework.web.bind.annotation.RestController; import io.swagger.v3.oas.annotations.Operation; @RestController @RequestMapping("/v1") public class DineshRemjeController { @Operation(summary = "This api is mainly to test the app for printing Welcome Message") @GetMapping("/hello") @ResponseBody public String printHello() { return "Welcome to First Step of Application Deployment on EKS"; } } -
Create a DOCKER File in root folder of spring boot application.
FROM openjdk:17
ADD target/dineshremje-1.0.0.jar dinesh-eks.jar
EXPOSE 8080
ENTRYPOINT ["java","-jar","dinesh-eks.jar"]
- build your application with command
mvn clean install
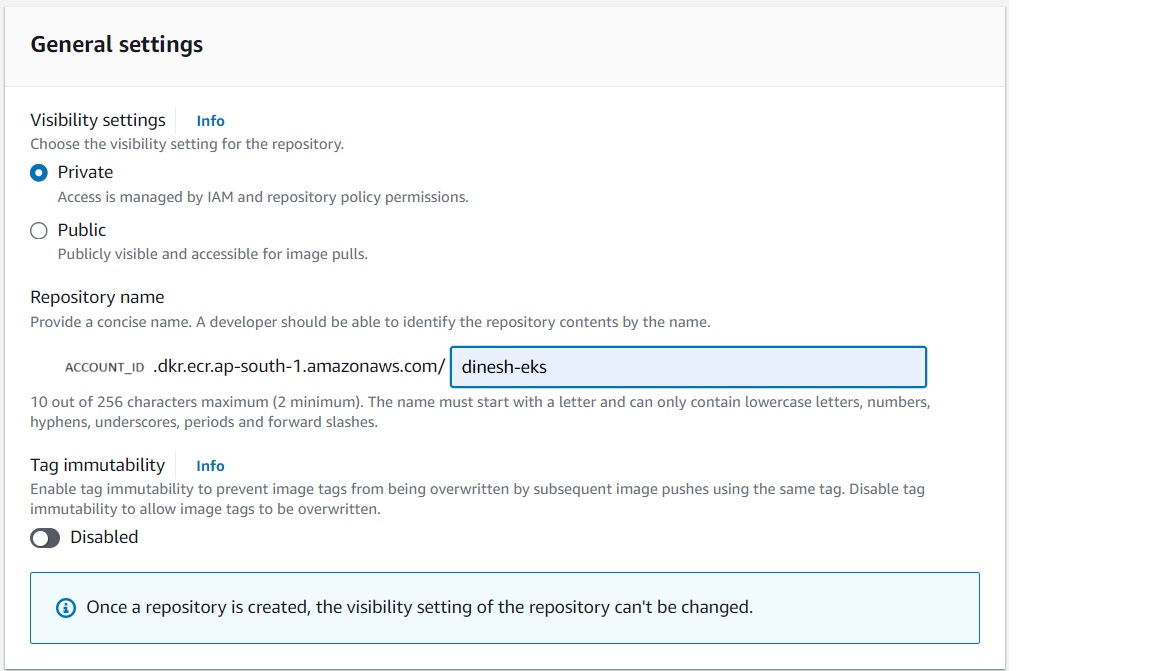
- Since we are deploying our application on AWS cloud infrastructure, we will create and push our application docker image to AWS ECR (Elastic Container Registry).
WE CAN STORE IT ON LOCAL MACHINE OR ON DOCKER HUB as well, but in order to have seamless AWS ecosystem we are going to push it to ECR. - ECR - Create Repository in ECR to store the image of our spring boot application. You can name the repo of your choice, over here I have chosen the name as dinesh-eks
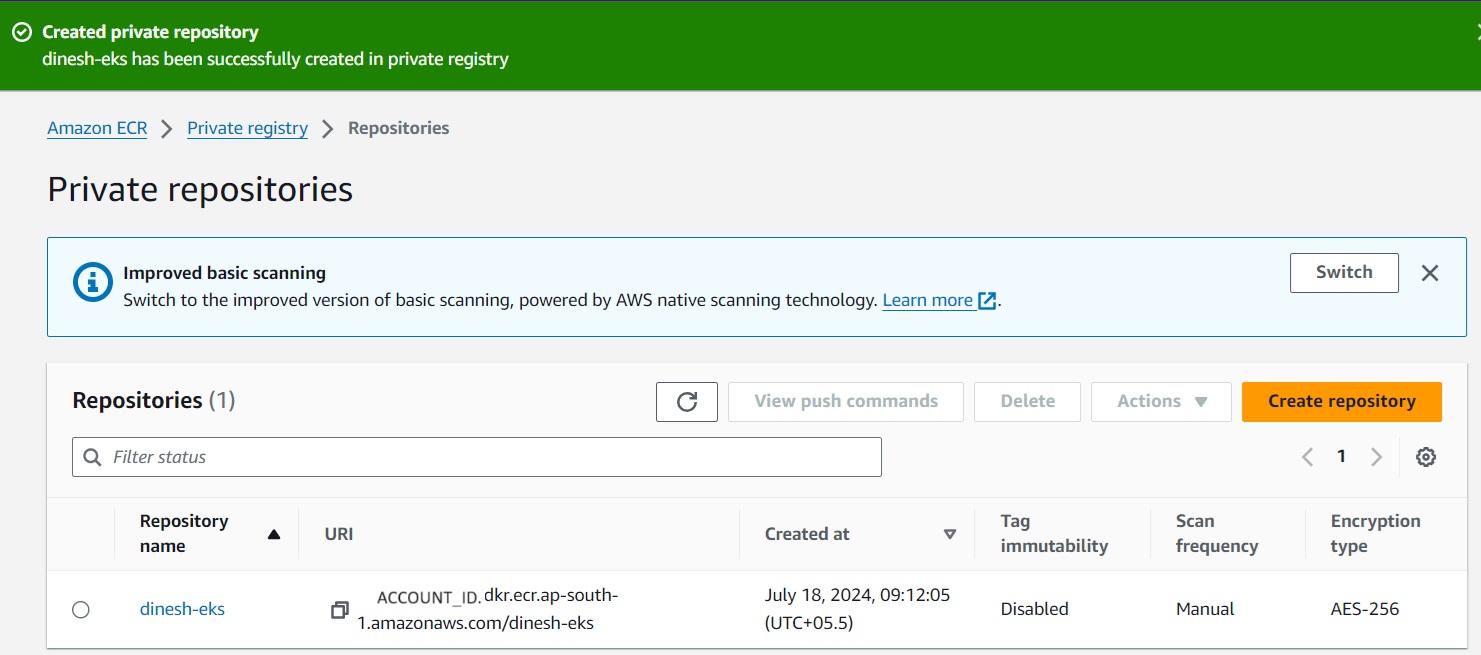
Click on create repositiry at the bottom of the page.
-
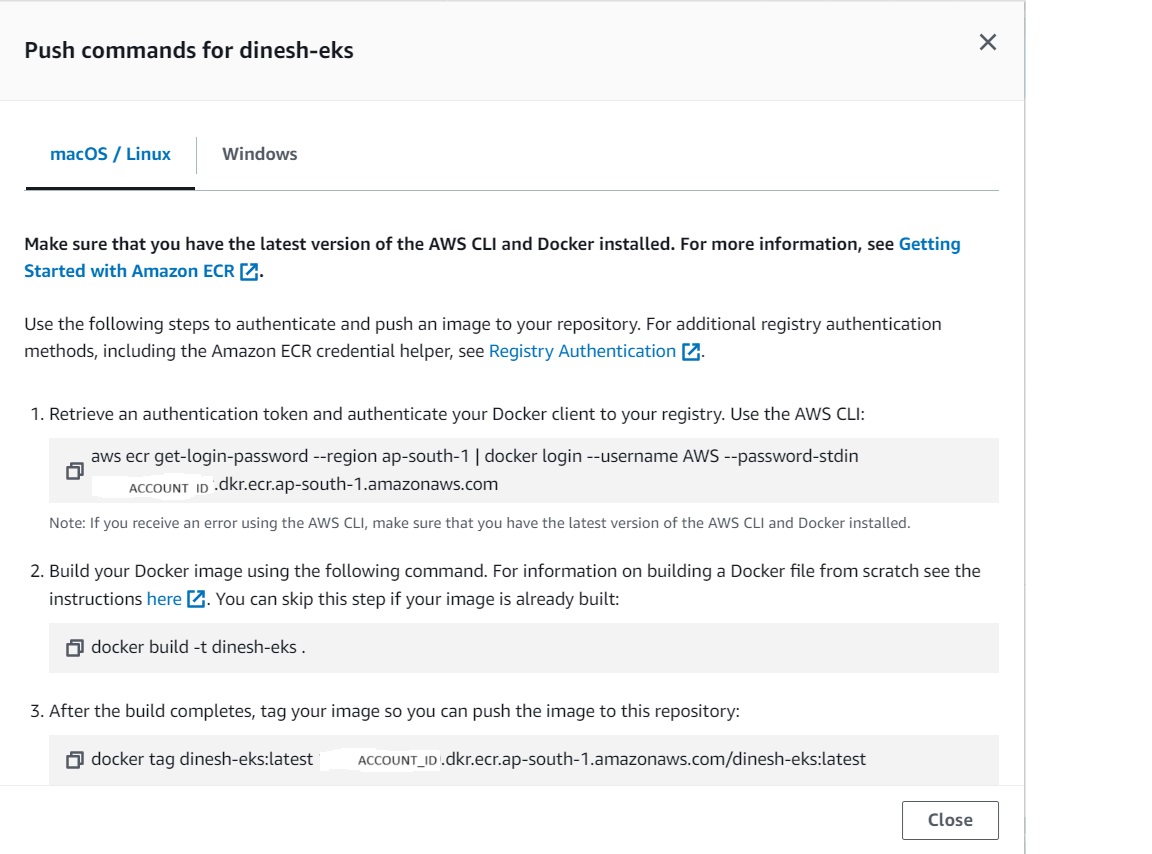
Select ‘View push commands’ and follow the provided instructions to build and push the image to ECR.
-
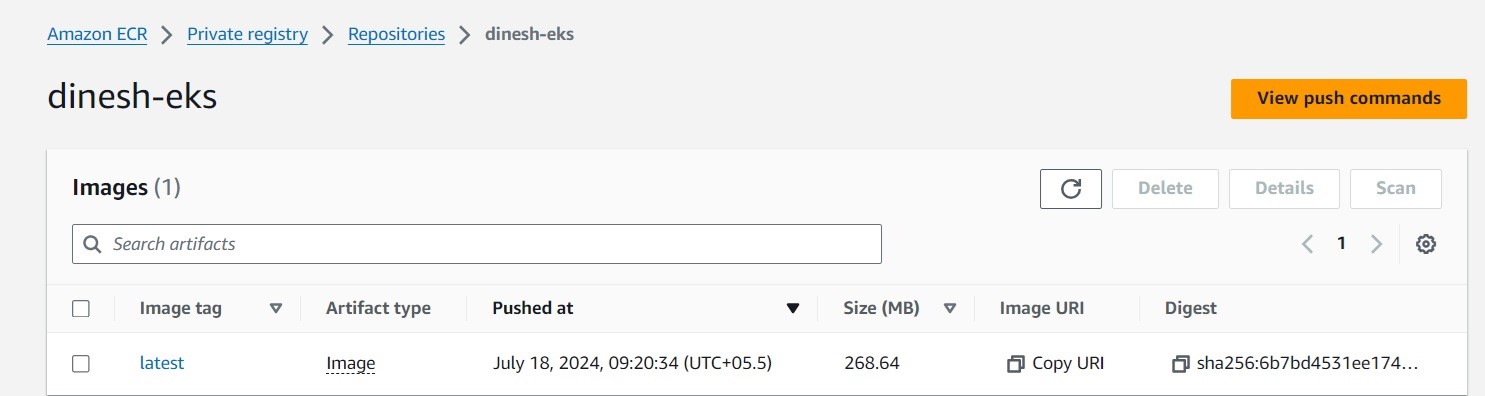
After successfully executing the commands mentioned below, if you refresh your ECR repository in the AWS console, you will find your image.
Click ‘COPY URI’ to copy the image URL and save it for use in the upcoming steps.
STEP 2: Create EKS Cluster
- Once the image is pushed to ECR, next step is to create the EKS cluster.
There are three ways to create cluster- eksctl
- AWS Management Console
- AWS CLI
- In this blog we would be using eksctl command to create cluster
- eksctl command to create cluster is as follows
eksctl create cluster --name dinesh-cluster --version 1.28 --nodes=1 --node-type=t2.small --region ap-south-1
The above command helps to create cluster in AWS account for a particular region with 1 node with EC2 instance of type t2.small, the version here denotes the kubernetes version.
Creation of cluster takes it own sweet time (near about 15 mins)
Once the cluster is created it will be reflected under Clusters section in AWS
Nodes are an essential component of Amazon Elastic Kubernetes Service (EKS) clusters, which are made up of two parts: the control plane and worker nodes. The control plane manages the cluster and schedules workloads, while worker nodes run the workloads. So basically Nodes in kubernetes is nothing but machine that runs containerized applications. So just by creating a cluster wont help in this case and hence a node is needed. There are basically two types of nodes in EKS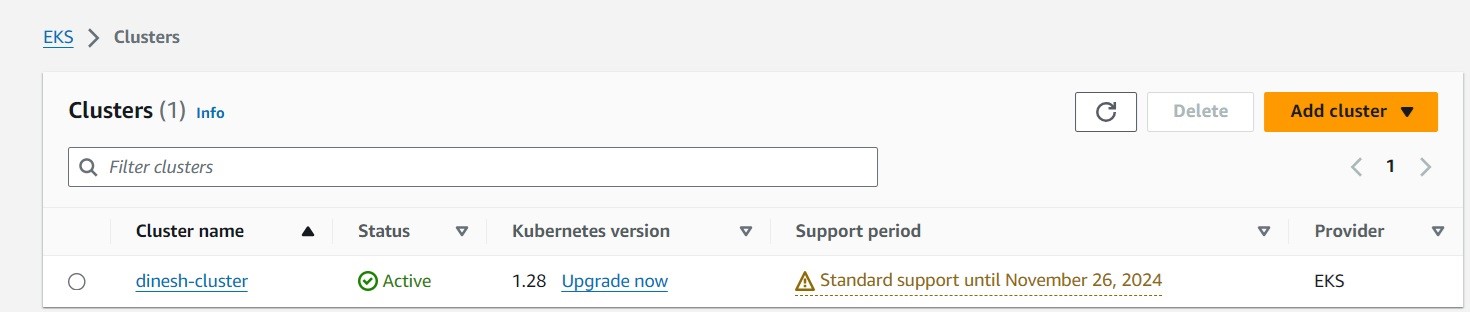
- Fargate - Linux
- Managed nodes - Linux
Fargate – Linux – Choose this type of node if you want to run Linux applications on AWS Fargate. Fargate is a serverless compute engine that lets you deploy Kubernetes Pods without managing Amazon EC2 instances.
Managed nodes – Linux – Choose this type of node if you want to run Amazon Linux applications on Amazon EC2 instances. Though not covered in this guide, you can also add Windows self-managed and Bottlerocket nodes to your cluster.
With the above command we create nodes of Managed nodes - Linux (internally it creates EC2 instance on EKS task) - Once the cluster is active we need configure our local machine or computer to communicate with cluster that is created.
Following is the command to do so
aws eks update-kubeconfig --region ap-south-1 --name dinesh-cluster
Once you run the above command /.kube would be created in the user directory and config file would be created or updated in it. Basically the new cluster configuration is created or updated in this file.
In order to test the configuration run the following commands
kubectl get svc
Output in command prompt or GIT bash would be shown as follow

STEP 3: Deployment of our application on EKS nodes
- To do the deployment we will start creating kubernetes file that defines the configuration for deployment make sure to provide correct ECR image URI which we copied earlier
- Next apply manifest file to start deployment and service
Manifest file for deployment
Command to applyapiVersion: apps/v1 kind: Deployment metadata: name: dineshapp spec: replicas: 3 selector: matchLabels: app: dineshapp template: metadata: labels: app: dineshapp spec: containers: - name: dineshapp image: {account_id}.dkr.ecr.ap-south-1.amazonaws.com/dinesh-eks:latest ports: - containerPort: 8080 --- apiVersion: v1 kind: Service metadata: name: dineshapp-service spec: selector: app: dineshapp ports: - protocol: TCP port: 80 targetPort: 8080 type: LoadBalancer kubectl apply -f dineshk8s.yaml
HURRAY!!!! Our Spring boot application is running on Kubernetes cluster on cloud.
For checking the status of our services run the following commands
kubectl get svc
kubectl get deployment
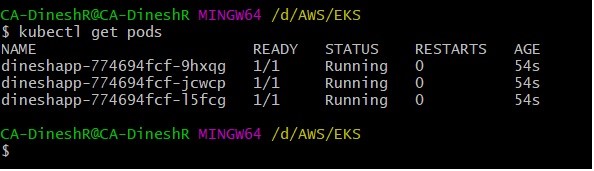
kubectl get podsOutput for kubectl get svc is shown above, for other two commands output are as follow
kubectl get pods
kubectl get deployment
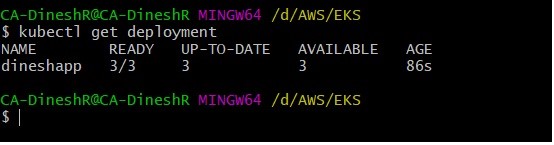
Note: If pods and deployment command shows the status as Running that means your application has been deployed successfully and would be accessible through the
external url obtained through svc command. You can invoke /v1/hello api using external host in browser
